Sunday, 20 January 2013

Beaded Cuff

A friend gave me a cuff bracelet from her trip to the Philippines.   It was a gorgeous piece that for months, I thought of re-creating it.  Finally, I decided I'd reverse engineer how it was made.  I also got great tips online from fellow beaders.
 
I used 2 types of wire of different thickness and my pliers (one for bending and one for cutting) for the cuff frame.


I formed the thicker wire to a rectangular shape.


I formed the wire into a semi circle and wrapped the entire frame with the thinner wire.  This process took me an entire episode of "Modern Family" and "Suburgatory".


The fun part is in choosing the beads to use.  For this project, I decided to use mostly yellow beads.


 I strung the beads around the cuff frame using the thinner wire.


And finally, the finished cuff bracelet!


Happy Sunday!

Saturday, 19 January 2013

getting organized

I pride myself at being (relatively) organized.  But there were a couple of times when we nearly missed a school appointment because the papers sent home from school were all over the house (usually starts in the ref but would find its way under the couch or by the bay window).  I did not anticipate the number of papers we have to deal with in school!

So over  the holidays, I created a DIY bulletin board where we could put all the paper work from school. 


It is made of 3 cork boards bought from the dollar store and covered with my new favourite Fancy Pants patterned paper and embellished with some banner dies from My Creative Time and alphabet dies from Papertrey. 


Then I added 1 magnetic board from Walmart so we can scribble stuff like grocery items to buy. 


These were mounted near our pantry area where school bags are stored.  Let’s see how  this new system will make things easier to remember...

Thanks for stopping by! Hope you are having a fabulous weekend!


Thursday, 17 January 2013

MIM #100 and Moxie Fab World Challenge

Today, I made a card and packaging for two challenges.  Over at Moxie Fab World, they are having a challenge to make your own background paper.  This is the first time I tried making my own background paper because oftentimes, with my patterned paper collection, I can find a background paper that will work for my project.  But I did not realize how much fun it is to simply stamp on a blank canvass and just let your creativity take you to wherever you want.  I got the Natural Beauties stamp set as a freebie from Papertrey last year.  And this is the first time I have used it.  How did I manage to hold off this long before using this lovely, lovely set?

Here is my card.  One of my new colour combo favourites lately is yellow and gray.  I love its muted and subdued feel and I think I like how my card turned out.


I used Papertrey stamps (Natural Beauties, Simple Sentiments), die (heart border), cardstock (harvest gold, smokey shadow, stamper’s white) and ink (harvest gold, smokey shadow for the sentiment).  I also used Amuse’s Slate and Provincial Gray inks for the leaves and flowers.

Notice the overhang on my card?  I love the look of some elements of my card going “outside the box”.  So enter Papertrey’s Make It Monday Challenge #100.  

The challenge this week is to create packaging for cards with oversized embellishments.  Dawn has shown us several ways to accomplish this.  As for me, this is how I normally package cards that are bigger than the normal A2 size.


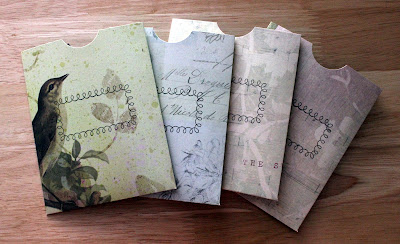
I used some coordinating patterned paper for my envelope.  This is a great way to use up those 12x12 papers I have been hoarding collecting.  I just basically made simple folds to create a pocket envelope like this.  And I finished it off with a half circle using my circle punch.


This is very useful for hand delivered cards (which I make a lot of).  So when my mood strikes, I build up my stock of these envies and even stamp a fun border for the recipient's name.  Here I used Fillable Frames #6 from Papertrey.


Thanks for stopping by!

Wednesday, 16 January 2013

pwp sketch #13 - pampered


I am back with another layout for Leigh Penner’s Pages with Papertrey.  This time, she has a sketch challenge. 


I used this sketch to create a layout of my DD’s trip to Melonhead, her go-to salon, last September right around the first week of school.  She loves going  there since aside from being able to choose the character chair she wants, she gets a lot of pampering by way of a blow dried, styled and glittered hair, some toys to bring home and a pony ride after her haircut. 

Here is my layout.  I moved around the placement of the title and embellishments but I kept the general design close to the sketch.


I used Papertrey’s Pretty Peonies stamp and dies, block alphabet dies,  inks (smokey shadow, simply chartreuse and summer sunrise), twine and patterned paper (striped smokey shadow).  I also used some My Mind’s Eye paper, Bazzill cardstock and Stampin’ Bella baubles.

Close up of my fun embellishment...


Thanks for stopping by!


Tuesday, 15 January 2013

best vacation ever

I want to share a layout I made of our first family vacation to Disneyworld last October (which according to my DD is the best vacation ever!).  I have been there before but experiencing it again from the perspective of a four-year old made it totally magical and more fascinating for me. 

I literally took hundreds of photos during that trip.  So how does one decide what to include in a layout which I told myself will be limited to just 2 pages.  Simple... I asked the little girl what she enjoyed most about her Disney vacation.  Who knew that a bus ride would land a spot on her top 10 favourites?

Here is my two-page layout.


And here are the individual pages..


I used Papertrey’s  upper case modern alphabet dies and Borders & Corners: Circle stamp (an oldie but goodie).  I also used a Quickcutz die for the year and a DCWV white cardstock.


Here I used Papertrey’s lower case modern alphabet dies, B&C: Circle stamp and the chevron die which I cut to create a row of arrows (something I really love which I have seen a lot of lately).  I also used paper from Simple Stories (Summer Fresh collection) and alpha stickers from October Afternoon.

Close up of the journaling..


Thanks for stopping by!

Monday, 14 January 2013

from grandkids with love


My friend Roger's mom recently celebrated her 65th birthday with a special surprise party given by her family.  Her 4 grandchildren designed this cake, featuring their Grandma's favourite colours.

Happy 65th, Grandma!  Wishing you a long healthy life filled with joy!


Have a sweet-filled week!
Bebsy


Saturday, 12 January 2013

PWP #16 - downtown downtime

Okay, so this will be my last holiday layout and my last layout (in a while) using my 12 Days of Christmas patterned paper (love those!). 

Two of our Christmas traditions include going to a Disney on Ice show and spending some quality downtime at a downtown hotel.  My daughter got sick during Christmas Day (we spent Christmas morning in a walk-in clinic with dozens of coughing and sneezing kids).   But we still managed to go to her show in the afternoon (that’s how determined she was to see Mickey and friends).    Couple of days after, she was feeling better to actually enjoy her downtown trip.  Here is the layout I made to capture that memory for this year.


I am also entering this in Leigh Penner's Pages with Papertrey challenge. The challenge is to use mixed elements in the title of your layout.  I really love this technique and have used it in several layouts already (watch out for them!). For this layout, I used a combination of die cut letters and alphabet stickers.

I used Papertrey’s modern alphabet dies and Calendar Basics stamp (for the year).  I also used MME’s 12 Days of Christmas patterned paper, DCWV cardstock and Echo Park alpha stickers. 

We recently did our Top 12 favourite projects for 2012.  As I looked at my favourite  layouts, I was reminded of  this one which I hoped to do again some time.  Well, that time is now.  I CASE’d myself and used the same layout on this one.  I kept the basic design the same but changed up the fun elements  a bit.  I think I will start CASE’ing myself more instead of always trying to do totally different designs.  Saves me some time and it is always good to know that I will  be happy with  the final outcome for sure.

Some closeups of my fun elements... 


Thanks for stopping by and hope you are having a fabulous weekend!


Related Posts Plugin for WordPress, Blogger...