Wednesday, 27 February 2013

months in review

One of the things I started last year was to come up with a monthly layout that captures the highlights of our month.  This is for the little things that I would have otherwise forgotten if not documented.  Now I can easily look back at when my DD started having a liking for peanut butter sandwich or vanilla yogurt and when she became obsessed with those little ponies.

These layouts were part of the marathon layouts I did over the holiday season (I already previously shared my Jan to June layouts).   So here goes my July to January “project life” layouts. (Just let me know if you need more details on specific supplies.  I am not listing it here due to the volume (and my fading memory, ha!) but I can look up specifics for you upon request).

For July,I thought the Stitches and Swirls make for an interesting background.  And did I tell you how I have recently fallen in love with the colour black?


Love black... here's another case in point.


I felt quite proud being able to use the largest flourish in Fancy Flourishes as an "S" in this layout (wink, wink).


Yellow and gray is one of my favourite go-to combos.  Glad to have found a My Mind's Eye paper in those colours.  And the hexagon pattern is a total bonus!


Hands down my favourite month of the year!  (as it is my DD's birthday month)


Here are the little things that made the holidays even more special...


My first monthly layout for 2013!  I am  also linking this to Leigh Penner's challenge #14 of using a stamp repeatedly in a layout.  I stamped "let it snow" repeatedly on the half and half die on the upper left (while singing let it snow, let it snow, let it snow!).


Thanks for stopping by!


Monday, 25 February 2013

papertrey february blog hop

It's that time of the month again... Papertrey's blog hop.  This month's challenge is about creating anything monogrammed.  Here are some inspiration photos...


I decided to make a CAS (clean and simple) monogrammed card for the Craftmates.  Here it is...


I  used Papertrey's Wreath for all Seasons and Ambassador Monogram sets for the stamp and Smokey Shadow and Fine Linen inks. 

Since it did not take me long to finish it, I decided to make a set instead.  After all, everything looks better in multiples!


And here are the 2 other sets...


Then for myself, I made a stationery holder using Papertrey's Timeless Templates Desk Top Organizer.


I also used the Ambassador Monogram and Simply Stationery sets, Beautiful Blooms and Button dies and raspberry fizz, harvest gold and kraft cardstock.  I also used some Crate patterned papers.  

Here's another angle of the organizer...


Enjoy the blog hop and thanks for stopping by!


Saturday, 23 February 2013

pwp #17 - birthday layouts part 2

I am back with the second installment of my layouts for my DD’s 4th birthday party.  If you missed the first one, you can check it out here.

Today I am focusing on the details of the party.  Every year during her birthday, I look at all my past layouts of how she celebrated her birthday.  It’s fun to look back and be able to remember little details like decorations, loot bags, food, activities, guests.  So I am doing the same for this year.

Here is my first layout.


I used Papertrey dies (modern alphabet, loop de loop, fruit fusion: apple, half and half), stamp (fruit fusion) and button.  I also used paper from Crate and Simple Stories, ribbon from Stampin’ Up and some brads and washi tape from my stash.

I am linking this to Leigh Penner’s Pages with Papertrey challenge of using a Make It Monday technique on a layout.  For this one, I used Dawn’s glitter tabs which I applied to my half and half die. 


For my last birthday layout, I tried to capture the kids’ activities.  Consistent with the school theme o f the party, I kept my colour palette to primary colours.


I used  Papertrey dies (modern and script alphabet, heart border), stamp (countdown details, borders and corners monogram edition) and twine.  I also used paper from Crate’s Storyteller collection and a tag from my stash.

Thanks for stopping by!


Friday, 22 February 2013

pwp sketch # 15 -- birthday layouts


My daughter celebrated her 4th birthday last November with a School is Cool party.  You can check out the details here and here

Here is the first installment of my layouts.  I am also linking this to Leigh Penner’s Pages with Papertrey challenge.  This time, she has a sketch challenge.


For her birthday layouts, I always start with a layout of her actual birthday.  I want to remember how she looked like and what she did on the day of her actual birthday.  In the past before she had school, it usually consisted of a pancake breakfast and a trip to her favourite indoor amusement park.  But this time, her birthday actually fell on a school day.  So, it involved mommy giving her a surprise visit to school with some treats  for her classmates. Here is my layout using the sketch above.


I used Papertrey dies (modern alphabet,  loop de loop) and patterned paper from Crate Paper’s Storyteller line and Studio Calico.

Close up of the journaling...


The next 2 layouts capture some of my favourite photos from her birthday party the following day.  Here is one with some fun pictures from the photo booth. 


I used the same Storyteller patterned paper from Crate, Papertrey’s modern alphabet dies and some Jillibean Soup’s alpha stickers.  I am also linking this to Leigh’s challenge of using mixed elements in your layout title.

Close up of the journaling...


The last one I will be sharing today is her Cake Time layout.  I made  this recently for the Colour Suite challenge when we attended the Crop and Create event. This was the layout which won me a never-been-released-fresh-from-winter CHA 2013 Basic Grey layout kit (yey me!).  The best part was I was chosen as winner by Kelly Purkey, one of my favourite crafty bloggers / stamp designers (talk about being starstruck when she handed me my prize!).

Here it is... I just love how happy she looked at these photos. 


I used Papertrey dies (modern and script alphabet, heart border, little hot rod), stamp (little hot rod (bus), postmarks) and cardstock (pure poppy for the hearts).  I also used patterned paper from Crate’s story teller line, Fancy Pants and Echo Park.

Thanks for stopping by!  Check back next time for part 2 of my birthday layouts.


Wednesday, 20 February 2013

mim #104 - handmade pinwheel

This week's Make It Monday over at Papetrey is all about handmade pinwheels.  With the days getting longer, spring is here before we know it! 

Here is my card...


I used  Papertrey's Ribbon and Bows set and berry sorbet cardstock.  The patterned paper is from My Mind's Eye.

Hope you are having a fabulous week!


Tuesday, 19 February 2013

card kits

We are back to regular programming after the many challenges over at the Papertrey Ink anniversary celebrations.  I did not win any prize from the daily random draws but I am happy that I was able to build up my stash of cards. I think I am set for most of the birthday cards I will be needing for the year!  Anyway, back to today's topic...

I have been seeing lots of bloggers come up with card kits to be given away as gifts or for sale.  I thought that for Valentine’s Day, I’d make one for the Craftmates.   I gave the kit to them when we got together for the Crop and Create event last weekend.  I thought that this might be a good fallback in case they are in need of something to work on during the crop. 

Here are the contents of the kit.  Each would make 3 sets of cards with matching envelope.


For the first card, I used Papertrey's With All My Heart set,  Limitless Layers: Heart die, kraft cardstock and some music sheet patterned paper from my stash.  I included this so they can create a handmade Valentine card for their hubbies.


For the next card, I used Papertrey's stamp (Sweet Life, Button Boutique), dies (Sweet Life, Button Card, Turning a New Leaf), fine linen cardstock and some October Afternoon patterned papers.


And for the last card, I used Papertrey's stamp (Rosie Posie and Everyday Classics), dies (Rosie Posie and double ended banner), aqua mist patterned paper and stamper's select white cardstock.  


Here is how I packaged them.  Remember those itty bitty valentine cards I shared here?  Well, I used them here to complete the gift.  I used the clear packaging Papertrey stamps usually come in with and covered up the label using the die from the Celebrations set, stamped with a sentiment from Signature Greetings (love this set and the sentiment is just perfect for my girls!)


I had a lot of fun putting together this kit.  For next time, I think I will include more random items so they can mix and match to their heart's content. I did not post photos of how the finished card would look like.  I am hoping one of the Craftmates will do  that and make me proud, ha! 

Thanks for stopping by!

Friday, 15 February 2013

croppin' and creatin'

We hope everyone is safe and warm following that historic snowstorm last Friday in the Northeast.  It would have been safer to stay home during the weekend, but all 4 of us dug ourselves out of our homes and braved the snow covered roads to attend Crop & Create, a special event organized by Scrapbook & Cards Today.  

This wonderful travelling event celebrates the art of paper crafting that features classes administered by the best teachers in the industry.  We also were treated to delicious food, a delectable dessert buffet, awesome makes 'n takes and fabulous goody bags!

It was a great opportunity to meet fellow crafters, share our stories and meet new friends. 

The event also featured inspiring challenges for the participants.  It was no surprise that our very own paper addict Irma won the Color Suite layout challenge. 10 snaps for Irma!!!

We highly recommend Canadian crafters to check out Crop & Create and see if this spectacular event is coming to your Province.  

Check out our photos below:


At the event photo booth


Bebsy with Kelly Wood, owner of big little words cards


Irma with Crop & Create instructor and blogger Kelly Purkey


Thursday, 14 February 2013

boutique accessory

Today, Papertrey introduced a very adorable set of products that allows you to create handmade hair accessories for the little girls (and old alike) in your life and a perfect way to package them as lovely gifts.  

So, the challenge is to create a homemade accessory of some sort making use of at least one Papertrey product.  I decided to make these darling clips for my little one.  Can't wait to get my hands on those new dies to make my sewing easier and a little more polished, ha!


I used Papertrey's beautiful blooms dies and packaged them using the button card die.  

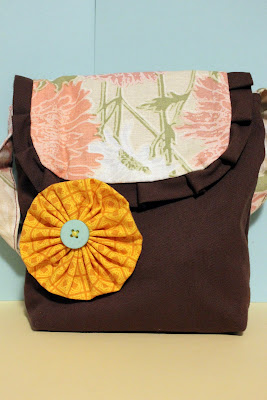
I also whipped up a flower brooch using my favourite yo-yo maker.  I finished it off with a Papertrey aqua mist button.  Ever wonder what to do with  those oversized buttons in your collection? Well, folks, here is one of them.


Thanks for stopping by and happy Valentines day!


Sharing the Love

Wishing all our friends a Happy Valentine's Day!


From
Virna & Louie
Irma & Clark

Bebsy & Don
  
Aimee & Mariano


Related Posts Plugin for WordPress, Blogger...